7 Days to Die
Before you begin
This guide covers creating a 7 Days to Die server, choosing its world and survival rules, connecting from PC, and managing players.
Use an updated PC copy of 7 Days to Die that matches the server's stable game version. Experimental builds and overhaul mod packs may not be compatible. Easy Anti-Cheat is enabled by default, so launch your client with EAC enabled when joining an EAC-protected server.
This guide does not promise console crossplay. The developer requires a crossplay-enabled server, EAC, a maximum of eight slots, and other restrictions for console compatibility. The hosting form does not expose a crossplay control, and choosing eight players alone does not establish compatibility. See the official crossplay server requirements.
Sign in to hourlygameserver.com and have enough credits for the first hour. Shared-server members need the relevant permissions to change settings or manage players.
Choose a region and server size
Choose a region near your group, then compare the available Server tier, Server size, resources, and hourly rate. 7 Days to Die is memory-intensive. Small can be a starting point for a small group on Navezgane; larger worlds and more players need more resources.
For randomly generated worlds, a larger World Size increases generation work and memory use. The form cautions against 10240 below Large. Higher Max Zombies (world) also increases CPU load, especially when players explore different areas.
Max Players is a connection limit, not a capacity guarantee. Check CPU and Memory in the Console during real play, including busy encounters. See choosing a tier and size.
Create the server
- Select 7 Days to Die from the games catalog and open its creation form.
- Enter a recognizable server name and, for private play, a joining password.
- Choose region, tier, and size, then select Next.
- Review Server Identity: set the description, player limit, visibility, and EAC.
- Expand World and choose Navezgane or RWG. For RWG, also review the seed and size.
- Expand Server Rules. For cooperative play, change PvP Mode from Kill Everyone to No Killing.
- If you have a compatible game-generated settings code, enter it in Sandbox Code.
- Continue to Review, verify the choices and hourly rate, and select Create Server once.
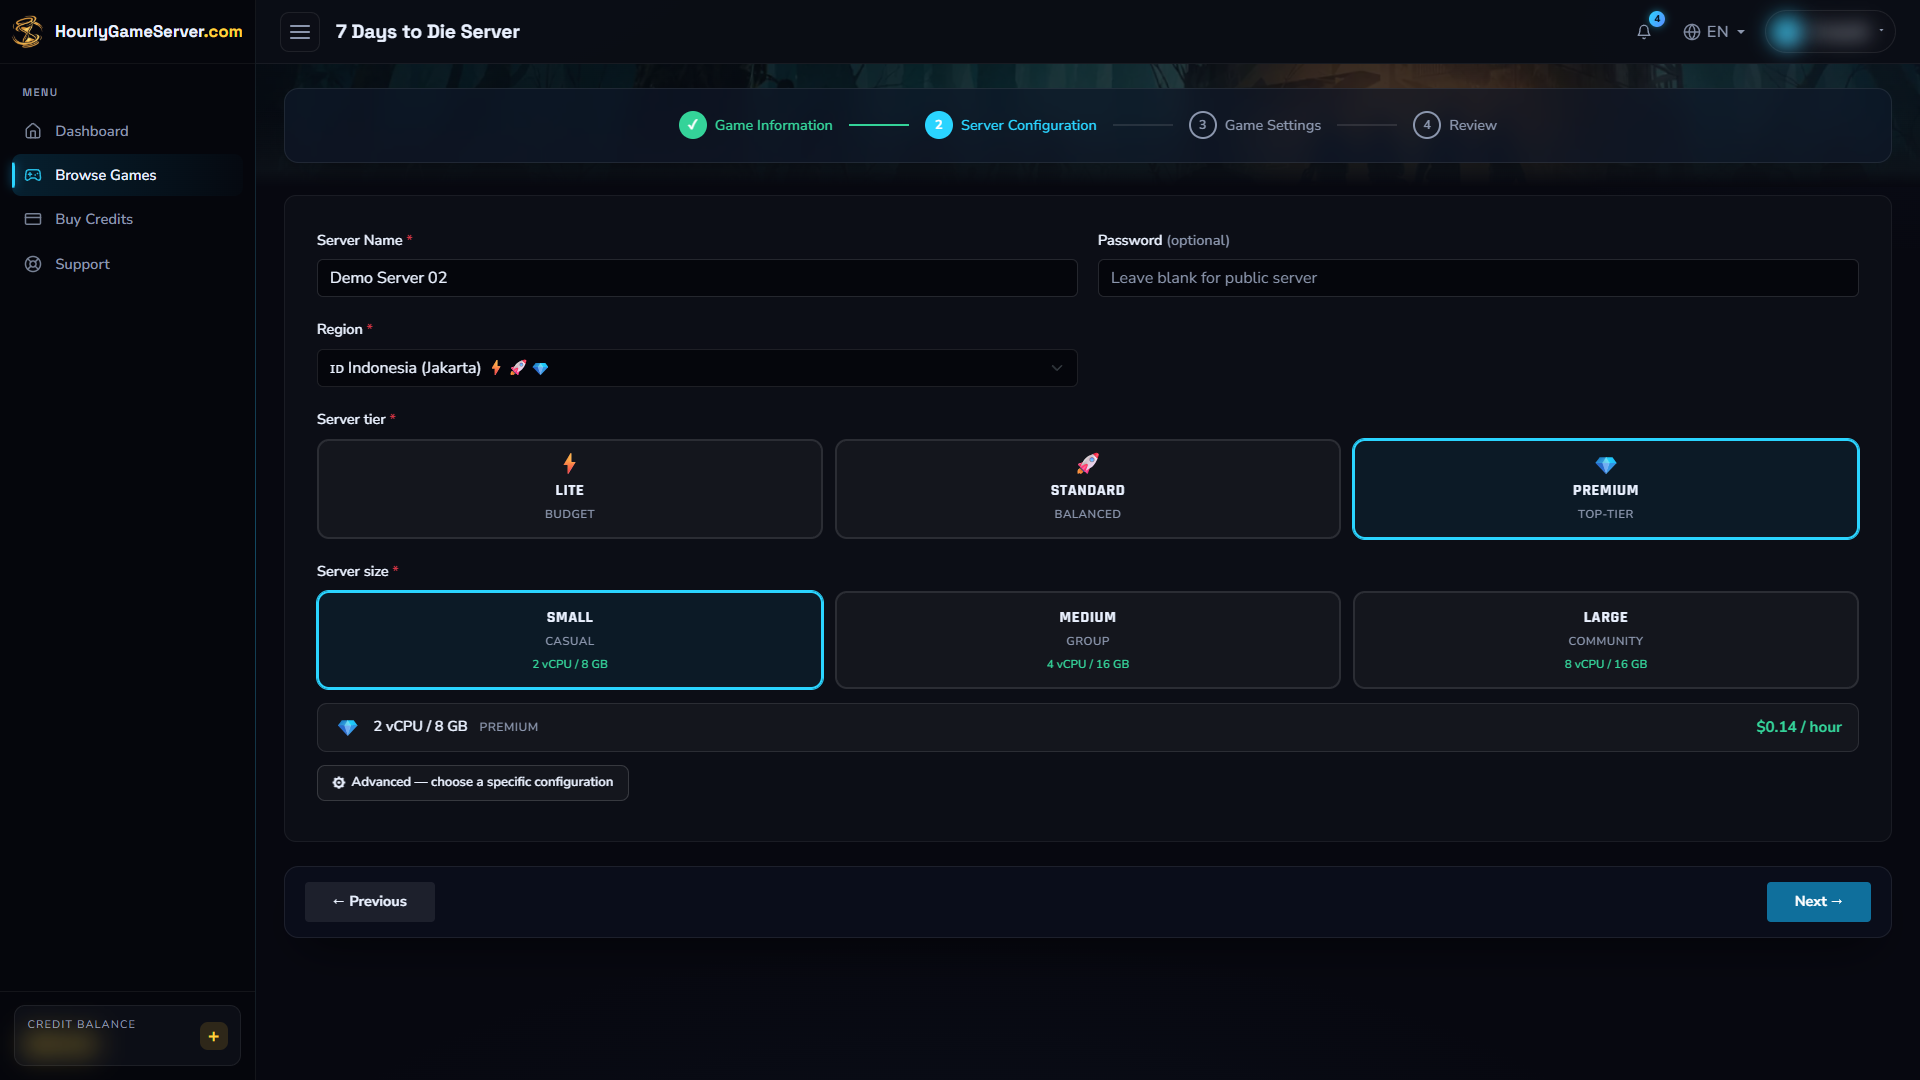
This example identifies the hosting controls, not a configuration suitable for every world. Compare the displayed vCPU and memory with your player count, map, and zombie settings.
Creation charges a full first hour if your balance can cover it. With insufficient credits, the server remains Stopped; top up before selecting Start. Open the server in the Console and follow Overview until Running.
Initial setup can take substantial time, particularly with RWG. Navezgane avoids random-map generation but still needs server preparation. Do not treat a long first start as a reason to submit another creation request or repeatedly interrupt startup.
Configure the server and world
Identity and access
| Control | Default and choices | Guidance |
|---|---|---|
| Server Description | A hosting welcome description | Text shown alongside the server name in the browser. |
| Max Players | 8; range 2–32 | Limit connections to suit your group and available resources. |
| Server Visibility | Public; Public, Friends Only, Not Listed | Public lists the server; Friends Only limits discovery to friends of connected players; Not Listed requires connecting by IP. |
| Easy Anti-Cheat | On | Clients must use compatible EAC settings. Turning it off does not add mod-install support. |
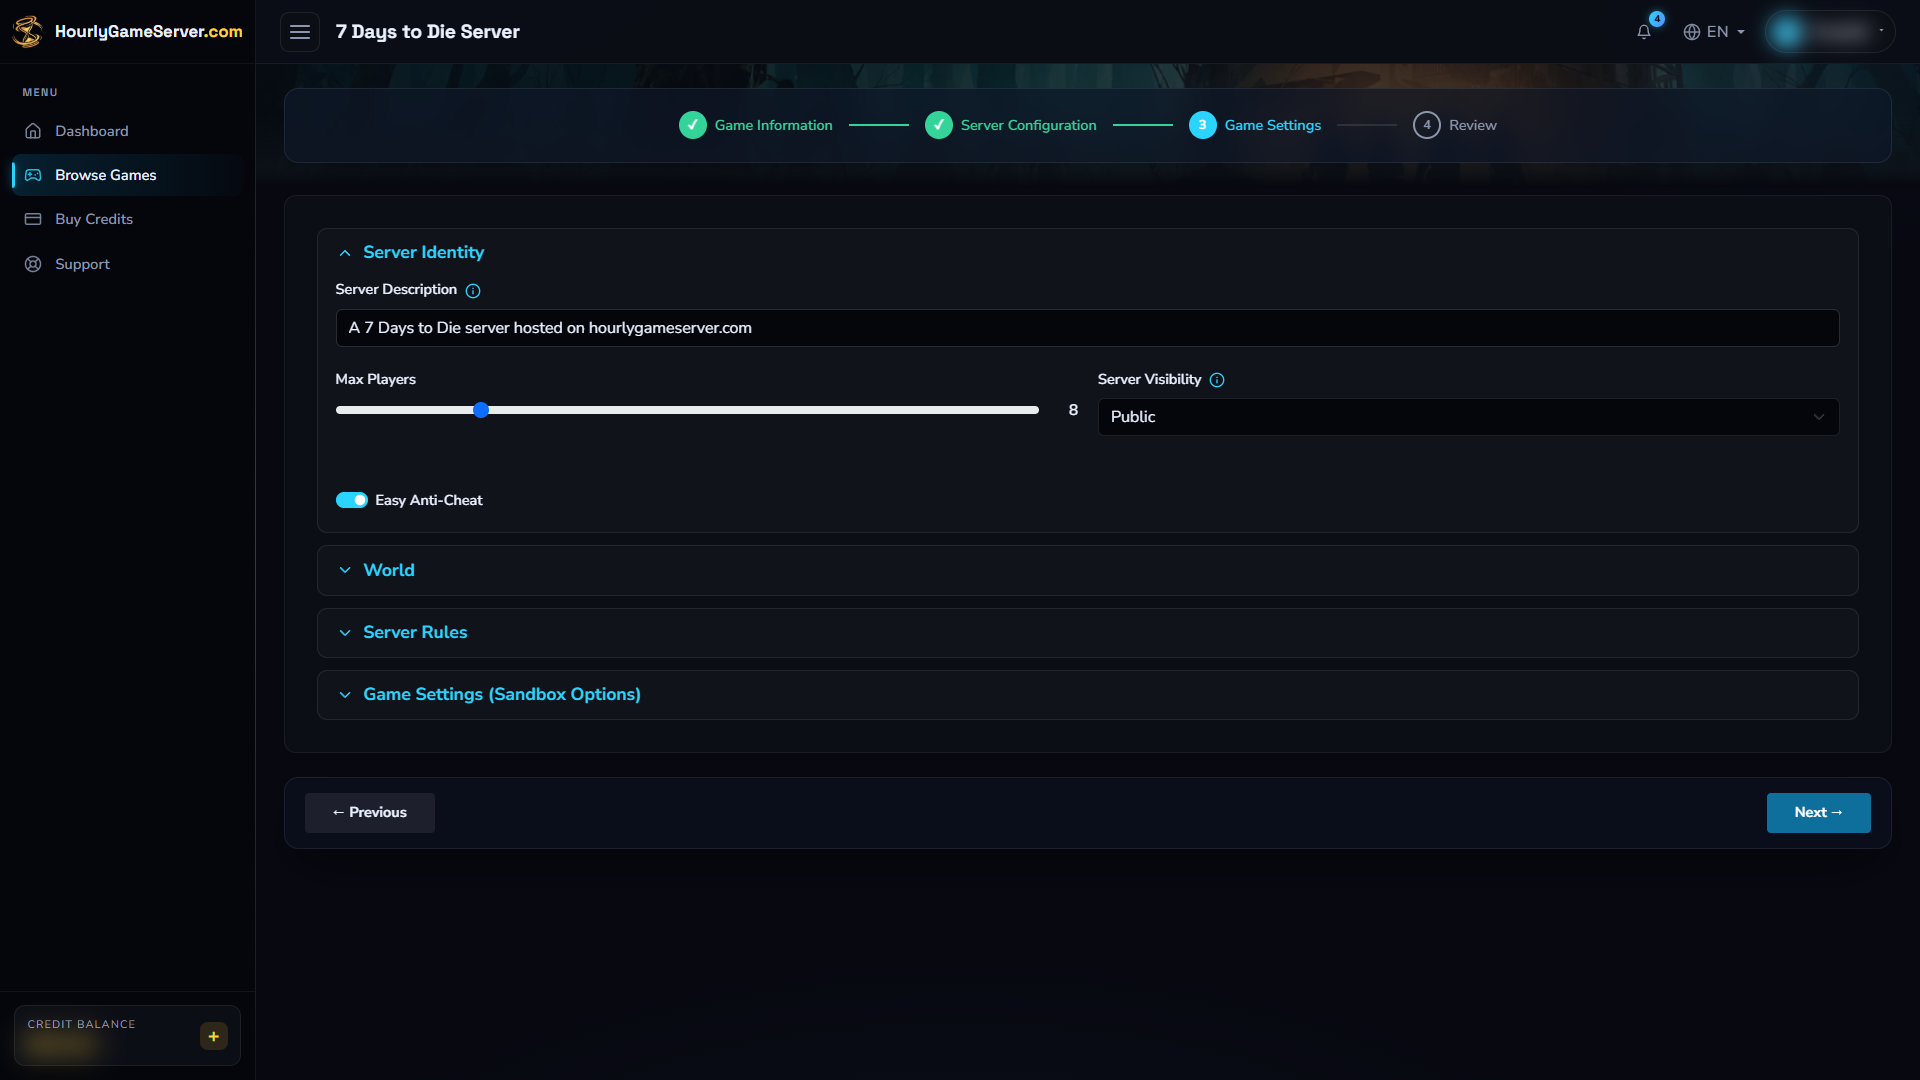
Review identity and access before continuing. World and PvP options are in other sections; expand those sections so the intended gameplay rules are not overlooked.
Visibility is not access protection. Set a joining password if only invited players should enter.
World generation
World defaults to Navezgane, the handcrafted map. Choose RWG for random world generation. Selecting RWG makes these controls available:
- World Seed: optional text used for generation. Blank uses an automatically chosen stable seed for this server. Keep the seed unchanged to continue with the same world setup.
- World Size: 4096, 6144 (default), 8192, or 10240 metres per side. Larger maps take longer to generate and use more memory.
Choose world, seed, and size before the first start. They are not controls for resizing an existing map or moving current progress into a different world. Keep an established server's name and world choices unchanged if you intend to continue the same save; ask support before making a world-changing alteration. Do not delete a valuable world as a troubleshooting step.
Survival rules and land claims
| Control | Default | Choices or range |
|---|---|---|
| PvP Mode | Kill Everyone | No Killing, Kill Allies Only, Kill Strangers Only, Kill Everyone |
| Creative Mode | Off | Enables the creative menu for everyone when on. |
| Max Zombies (world) | 64 | 30–120, in steps of 2 |
| Land Claims Per Player | 3 | 1–10 |
| Land Claim Size (blocks) | 41 | 21–91, in steps of 10 |
For a cooperative survival group, explicitly choose No Killing and leave Creative Mode off. The zombie limit applies across the world, not separately to every player. Land Claim Size is the edge length of the protected area around a claim block.
Sandbox options
Use Sandbox Code for the game's bundled gameplay options, such as difficulty, XP, loot, blood moon frequency, zombie speed, traders, and quests. The hosting form does not offer separate sliders for each of these.
- In the matching version of 7 Days to Die, open New Game and its advanced/sandbox options.
- Choose the rules you want and copy the settings code produced by the game.
- Paste that code into Sandbox Code without manually editing its contents.
Leaving Sandbox Code blank uses the game's default preset. A code from another game version may be rejected or fall back to defaults; verify the rules after joining. This code configures gameplay. It is not an invite code, server address, or joining password.
Stop, save, and start
- Warn players, using Broadcast Message if appropriate.
- Select Stop and wait for Stopped, allowing the world to finish saving.
- Open Game Settings, edit the required controls, and select Save Settings.
- Select Start and wait for Running.
- Rejoin and check that the intended rules are in effect.
Game settings cannot be saved while the server is running, starting, or stopping. A normal stop preserves world and player progress and pauses hourly billing when shutdown finishes. Starting again restores the saved world. Deleting the server permanently removes its save data; use Stop when you want to return later.
Connect from the PC game
- Once Running, copy the current IP Address or Domain Name and retrieve the joining Password privately from the Console.
- Open Join a Game in 7 Days to Die.
- Search for the server name if it is listed, or choose Connect to IP.
- Enter the copied address and port 26900, then connect.
- Enter the server password if requested.
The game connection uses 26900; the server also uses UDP 26900–26902. Do not enter an administration port or Sandbox Code in the address field. A Not Listed server is expected to be absent from search results. Players do not need to install the dedicated-server application or forward its ports on their home router.
Administration, players, and mods
While Running, open Player Management to view the roster and use Kick, Ban, Unban, Make Admin, or Broadcast Message.
Verify the player's identity before confirming an action. Kick disconnects the current session; Ban blocks rejoining until unbanned. Broadcast sends a message to players currently online. Make Admin grants powerful in-game administration rights, not ownership or shared access to the hosting Console. Give it only to trusted players. The Console does not offer a corresponding revoke-admin action.
There is no Mods section for 7 Days to Die. Overhauls, mod uploads, and plugin installation are not offered here. There is also no separate game web-admin dashboard provided by this service; use the available Console controls.
Troubleshooting
| Symptom | What to check |
|---|---|
| First startup is slow | Allow server preparation and RWG generation to finish. Larger random worlds need more time and memory. Check the status message and Activity Log before retrying. |
| Server does not appear in search | Check Server Visibility and browser filters. Try Connect to IP with the latest address and 26900. |
| Client cannot join | Match the stable server version and EAC settings, remove incompatible client mod packs, and verify the joining password. |
| Console players cannot connect | Eight slots and EAC alone do not prove crossplay support. This form does not configure all official console requirements. |
| Unexpected PvP | The default is Kill Everyone. Stop, select No Killing, save, and start for cooperative play. |
| Difficulty or loot did not change | Confirm the saved Sandbox Code came from the matching game version; a blank or incompatible code can leave default rules. |
| Lag during busy encounters | Review CPU, Memory, zombie limit, map size, and player count before choosing more resources. |
| Player actions unavailable | The server must be Running and your shared role must allow player management. Wait for the first roster update. |
If the issue persists, contact support with the server name, the time of the problem, and the visible error. Never include passwords, tokens, or private player identifiers.